Saturday 30 June 2012

Editorial Review of Psykopaint


Just like there's a spectrum of art supplies from crayons to Connoisseur Kolinsky sable brushes, there's a spectrum of painting applications from Microsoft Paint to Photoshop and Corel Painter. Psykopaint is a Flash-based webapp that sits somewhere in the middle of that spectrum, neatly sandwiched between deviantArt muro on the draw-it-yourself side and Dynamic Auto-Painter on the algorithmic photo-to-painting side.
Psykopaint brushesPsykopaint offers an array of thirteen different brushes for free.
Like deviantArt muro, Psykopaint is a webapp. Unlike muro, however, it is entirely Flash-based. You can use it to create art from scratch, but its real mission is to help you convert photographs into paintings. Dynamic Auto-Painter does the same thing, and you only have to tweak a few sliders and set it loose on your photo. Psykopaint is a much more hands-on experience: You pick a brush and paint with it all over your photo, transforming it bit by bit. So it feels(a little bit) like you're painting , but really, Psykopaint is doing all of the heavy lifting for you--almost like working with a coloring book. I tried using Psykopaint with my Intuos5 pen tablet, but it actually worked better with my trackball: It is not pressure sensitive, nor did it respond to the angle in which I was holding the stylus. A desktop version of Psykopaint, not yet released at the time of this writing, promises to detect pen pressure.
Psykopaint screenshotAfter playing around with brushes and layers, you can end up with something that doesn't look much like a photograph at all.
Psykopaint also shares a business model with deviantArt muro: The basic application is free, but extra brushes and tools cost money. You start off with a set of 13 free brushes inspired by famous painters (with names like Manet and Renoir), but almost any other tool in the interface costs money. Want to use an eraser? That'll be five coins. Want to be able to add layers to your painting? Forty coins please. Coins are priced in bulk: 15 coins cost $2 (around $0.13 per coin), and 1,000 coins cost $80 ($0.08 per coin).You can also buy bundles of 50, 100, 200, or 400 coins. Brush packs cost between 10 to 35 coins, which means that 200 coins ($18) will get you very far. You can also get some coins, but not very many, for sharing PsykoPaint with friends. Once you buy a tool, it's yours to keep, not just for the current painting. While having to constantly shell out for new features feels a bit greedy at first, it actually lets you grow into Psykopaint and not become overwhelmed by a glut of tools. Most users will probably become very familiar with the tools they have and spend money on new tools only when they really need them.
Psykopaint brush purchase screenshot
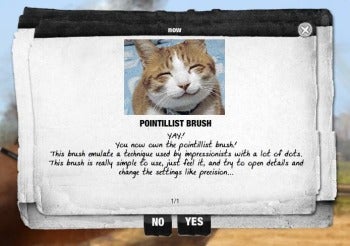
Whenever you purchase a new tool, an overjoyed cat congratulates you.
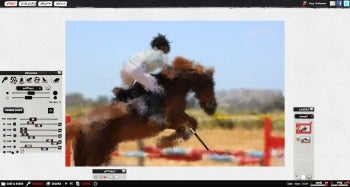
Layers are handy in Psykopaint. You can create a background layer and paint over it with a course brush, and then create another layer for the foreground and use a finer brush to make the main subject of your photo stand out. You could even use different brush styles, such as a wild impressionist brush for the background, and a more detailed spot brush (10 coins please) for the foreground. Painting fine details is tricky: When I drew over a photograph of a rider jumping with a horse, the harness and other fine details of riding tack were lost. Still, you could say that the same thing sometimes happens when you draw with real brushes.
While Psykopaint's brushes are beautifully detailed and highly customizable, its rendering engine doesn't come close to that of Corel Painter. With Painter, watercolors dry into the paper, and oil paint mixes convincingly. Then again, Psykopaint does not bill itself as a natural media application, but more as an inexpensive way for people to express themselves artistically without an extensive education or years of practice. And in that, Psykopaint does admirably well.

Note: The Download button takes you to the vendor's site, where you can download use the latest version of the software. Some brushes and other effects cost coins purchasable within the program. 

Thursday 21 June 2012

Top Photo Editing Tips


Digital camera in hand, you mingle with friends and family on the lawn for the last big summer BBQ. As you take a few pictures, though, they all approach you, one by one--and beg for copies.
Wait a minute. That wasn't part of the plan! Now you need to turn around and e-mail shots from this photo collection. And when you sit at your PC later and examine the images, you realize that they're not your best work. Some are crooked, others have Omen-esque red-eye. Others are dark and murky--guess the flash didn't fire.
Don't worry, though. Here are ten quick and easy ways to fix your photos and make them look so good you won't have any qualms when you click Send.

1. Stop Looking Sideways: Rotate the Picture

Cameras don't take square pictures; they take rectangular ones. To frame a scene that's taller than it is wide, you probably turned the camera on its side before you snapped the shutter release. That's great, but don't send those sideways pictures to your friends. Turn them right side up first.
You can rotate your sideways pictures in almost any image-editing program. In Paint Shop Pro, open the picture and choose Image, Rotate and turn it to the left or the right by an even 90 degrees. If you have Windows Me or Windows XP, it's even easier. Just double-click a picture to open it in the Windows Picture and Fax Viewer. Then click the Rotate Clockwise or Rotate Counterclockwisebuttons at the bottom of the screen.

2. Seasick? Straighten the Picture

In the rush to take a photo, we don't always get the camera perfectly level--and that adds up to photos in which the horizon is slightly askew, as if you had shot the pictures from a sailboat. Fear not. Crooked digital photos are nearly as easy to straighten as picture frames hanging on your wall. (And they're more likely to stay straight after you fix them, too.)
All you need is an image editor that lets you rotate pictures a degree at a time, and most programs have this feature hidden somewhere in the Edit or Image menus. Look for an option to rotate the picture and enter a very small value, like one degree to the left or right (depending upon which way you need to adjust the photo).
In Paint Shop Pro, click Image, Rotate and check the radio button beside Free. Then enter your small value. If that doesn't fix the problem, undo your edit (choose Edit, Undo) and try again with a different number. You can rotate your photo by fractions of a degree, like 0.7 or 1.4 or 2.5. When you experiment, always undo your last rotation and try again from the original version; if you pile rotations on top of rotations, you can create noticeable "glitches" or blurriness in your photo.

3. Crop Away the Background

In your mind's eye, the picture may have been a shot of your nephew's birthday cake. But now that you see it on your PC, you realize that you didn't zoom in very far--so you've taken a picture of half the room as well. Use your image editor's cropping tool to cut away the unwanted part of the picture and isolate just the meat of the scene.
In most image editors, the cropping tool lives in the tool palette and looks like a picture frame. Click the cropping icon and, as you hold your cursor down at a starting point, use the tool to draw a rectangle inside the picture. Arrange the crop mark to re-compose your photo and discard the unwanted background. To do this in Paint Shop Pro, draw your rectangle, then click the Crop Imagebutton in the Tool Option box that floats around on the screen.

4. Shine Some Light in the Darkness

Is your photo too dark? A slight underexposure can ruin an otherwise great photo, so punch up the brightness a bit to give it some life. Try your image editor's gamma control--a tool that's designed to brighten the darkest parts of the picture without "overexposing" the parts that are already bright. If your image editor offers gamma control, you'll usually find the feature in menus like Colors or Image. Some programs, such as Microsoft Photo Editor, let you access the tool (Image Balance) from the toolbar.
In Paint Shop Pro, choose Colors, Adjust, Gamma Correction. You can raise the gamma as high as 1.3 or 1.4 in many pictures before the scene gets too washed out. But whatever level you choose, be sure to keep an eye on the evolving picture as you experiment with each setting.

5. Zap the Red-Eye

Using your camera's flash can sometimes cause the dreaded red-eye effect. If your photos look like they're filled with demonic partygoers, you can zap the red-eye out of your shots automatically in many image editors. In Paint Shop Pro, choose Effects, Enhance Photo, Red-Eye Removal, then zoom in on the red eyes and create a circle of color directly over the red spot.
If you have a basic image editor, like Irfan Skiljan's IrfanView or Microsoft Paint, that doesn't have an auto-correction tool, just zoom in on the eyes and paint over the red with a natural-looking shade of black or blue.
Remember that you don't have to be Picasso to eliminate red-eye convincingly. When you zoom back out, the eyes will be small enough that your brushwork should look more than adequate. The important thing is to paint over the red.